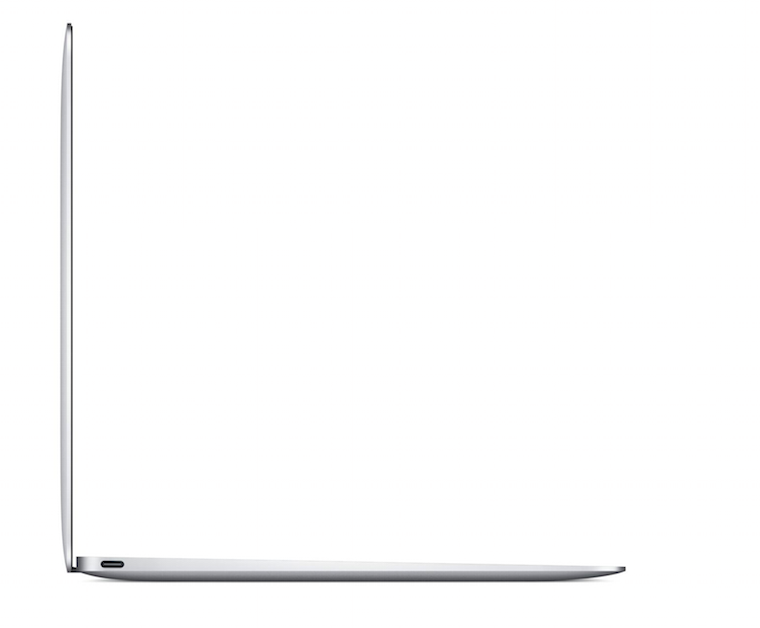
Challenging Yourself with Light

Flowers

Good light can make or break a photograph.  You can either play it safe or really push yourself.

Looking at a shot it can for the untrained eye be difficult to tell how a shot was lit.  The top shot was actually outdoors and is a flower in the garden.  I put a black cloth behind the flower and then added a flash to the side and the front.  The shutter speed was high as was the flash power, this completely overpowered the daylight giving the feel I wanted.Lisa

The shot of Lisa is a very simple lighting setup, Two large soft boxes each side and a softbox over the model giving a kiss of light to the hair.


AliceOnce again the shot above is an interesting mix of daylight and flash.  The daylight is deliberately underexposed with most of the light coming from a single Elinchrom flash head shooting into a brolly.  The most challenging aspect of the shot once I had balanced the daylight and flash was the wind, it was after this shoot I purchased two heavy C-Stands.

Try challenging yourself with flash, either flash on its own or mixed with daylight, and once you find a setup that works file it a way for use when you need guaranteed results, then go out and challenge yourself again.


Adobe Lightroom Mobile – Stuck

Lightroom Mobile

I did a quick shoot last week to test the D800 in studio conditions, afterwards back in the office, I did not have time for any editing so I quickly imported them to Lightroom, ran through my normal backup routine then added the photographs into a Collection to sync up to the Cloud.

The intention was when I had a free moment or two, to grab the iPhone or iPad and using Lightroom Mobile app to do some initial editing.

The problem was it never seemed to sync and the photographs never appeared on either of my devices.  Checking my settings I noticed that it said the app was unlicensed.  No matter what I tried I could not get it to sync and it would not even let me log out.  In the end I deleted the app from the iPhone and re-installed; once I logged in it burst into life and proceeded work.

Testing Gear

Nikon D200
Nikon D200

Getting new gear is always inspiring, but if you have a new piece of equipment or you have not shot with a particular piece of equipment for a while, its always worth having a practice shooting session.

I now have a Nikon D800 and also a PhaseOne back for my medium format Hasselblad, so I am keen on getting some meaningful practice before I use them for a real paid shoot.

With that in mind I have booked a studio for this week and have a friendly local model, so I’ll be shooting some nice boudoir lingerie images.

The intention is test the D800 and Hasselblad in a studio situation.  Plans may have to change as I need a new trigger for the Hasselblad, and the new trigger for the Hasselblad has not yet arrived.  I may just have to use my normal wireless trigger that works on my Nikon’s and Leica’s.  It does mean i’ll have to get a few dreamy Leica Summilux shots, oh what a shame 😉

So today I’ll be giving the gear a quick check and charging batteries and checking memory cards.  Two standard lens for the Nikon and two spare batteries just in case.

Puffin

I’ll also be planning some wildlife test shoots.  So far its just been the Nikon in the garden but later this year I am planning on visiting Hartsholme Park with Chris.  He will have his new Olympus 40-150mm f2.8 PRO by then so its going to be a good testing day.

Lightroom Tip – Catalogue Import and Export

Import export Lightroom

By default when in the normal catalogue view within Lightroom the two main buttons at the bottom offer import photographs or export photographs.

But what about importing and exporting catalogues; well it is in the menu system but a faster way to get to it, is to just press the option key.

import export catalogueWith Lightroom, you often get a different set of options on the buttons when you press the option key, give it a try.

PS if your a Windows user try the Alt key.


Sony A7 Mk II

Sony Alpha A7rEveryone seems to be bringing out a Mark II or Mark III at the moment.

The full frame mirror-less A7 range has been getting better.  Its main issues have been noisy shutter, vibration, a slightly inferior RAW file that seems to do some internal lossy compression before saving.

While I admire the continued efforts of Sony with these endless releases of ever improving cameras I also feel sorry for people that buy Sony gear and then six months later they release a better model.  I also find it irritating that they release cameras without battery chargers and lens hoods are often an optional extra.

D800Currently my full frame needs are met with my Nikon D800, and one day I hope a Leica M9 or M 240 so while my GAS (Gear Acquisition Syndrome) wants me to buy one the limitations and the fact that it would just duplicate my Nikon and Leica system stops me.

Still if your after full frame and autofocus in a small package its hard to ignore.

Photo Walk
Photo Walk

The truth of the matter is that within ten years cameras like the low end Nikon and Canon SLR’s will look far more like the Sony A7 then a SLR.  They will go mirror-less.  Its a matter of cost.  Producing a mirror box and optical viewfinder is expensive and when Nikon and Canon do jump onto this, possibly when the autofocus matches there low end SLR’s it will happen.

Then its going to be difficult to see where Sony, Fuji etc are going to go.  I feel Panasonic and Olympus have a better chance of being a long term success, as the smaller micro four thirds cameras can make an excellent second small system

Software Updates again

iPhone 6If your an Apple user you are most likely already aware that the latest bug fix for iOS 8 was released today v8.1.1, not played with it much yet but lets hope things are getting more stable.  I have had a few app crashes but nothing too bad.  Certainly not like iOS 2.0 which was in my opinion unusable.

Leica M4 & M8 by Candle LightOf more notable concern for camera users, at least for us Leica users was updated firmware for the Leica M series.  Not having the latest M I checked the site anyway expecting not to see anything for me but was surprised to see Leica have released updates for all the digital M series cameras including the original digital Leica M8.

Its great to see such support for a camera that was released back in 2006 I think and my M8.2 was 2008.

Certainly from recent history only Fuji seem to be giving there customers such good support.

Chris has also recently blogged about firmware updates for his OM D here.  I was glad to see that the Leica updates are applied the same way as my Nikon updates, just copy the firmware update to an SD card and update from Camera.

Like Chris I prefer this method of update.  I have not updated a recent Sony, but when I had to update the Alpha A55 I had to use the computer, see here for details.

Click on the link below for the update download and instructions.

Instructions for updating the
LEICA M8/M9/M Monochrom/M-E Firmware

  1. Format an SD memory card in your camera.
  2. Turn off the camera and insert the card into an SD card reader – either integrated or connected to your computer. (A reader is required for Firmware updates).
  3. Download the Firmware file from the Leica Website using the Service & Support/Support/Downloads Menu and unzip the file.
  4. Save the unzipped file (extension “.upd or .upm”) at the top level of the card’s folder structure.
  5. Remove the card properly from your card reader, insert the card into the camera and close the bottom cover.
  6. Turn on the camera using the main switch and wait for at least 3 seconds before continuing with step 7.
  7. Confirm the prompt that appears in the monitor as to whether you want to update the firmware on thecamera to the new version.

    The update process takes around 180s. You will then be prompted to restart the camera using the main switch.

  8. Turn the camera off and back on again.

Does the average Photographer need fast glass

Door FrameI was talking to another photographer recently who had switched from his large SLR’s to one of the newer large sensor bridge cameras.

I had a camera with me and attached was a fast f/1.4 50 mm lens.

He ventured his opinion that fast lens were no longer required. Also that if you wanted that fast aperture look you can fake it in Photoshop.

An interesting view and I can partially see the point but I suppose it depends on how you define a average photographer.

An average portrait photographer may want a fast portrait lens.

I have seen some lovely Landscapes shooting into the sun with a fast wide angle and sports and wildlife photographers often need fast glass to get their images.

So what’s right. Well neither view. If your happy and can get the image you want without fast glass then good but if you need fast glass and can afford it then use it.

I know of one photography who has two 28 mm lens. One at f/1.4 for when he needs speed but the other which he generally uses is f/3.5. As its smaller lighter and easier to use.

Setting up a camera – Part Two Leica M8

Steep Hill GigWell after telling you how I have my main SLR setup I thought I would follow up with my Leica.

The memory banks on the Leica are called User Profiles and there are four of them, unfortunately only three of them are useable.

  • User Profile 0
  • User Profile 1
  • User Profile 2
  • User Profile 3

The first profile is a system profile, it sets up the camera basically for beginners, so sRGB, jpeg only and base ISO.

User Profile 1 is my main profile.  Set to RAW, shutter to quiet mode and no image review, ISO is set to the base at ISO 160.  White balance is on auto.

User Profile 2 is also often used, especially when I want to shoot black and white.  Its the same as above but also saves out a jpeg in Black & White.

Lastly User Profile 3, this is same as User Profile 2 but has ISO set to 640 and white balance to 5000 K.  Useful under dark conditions under artificial light.  I also have image review set on this mode but no jpeg.

With this combination and the quick menu access button (the set button) I can set the major key areas then just override as I require.

Eg, need image review at base ISO, select User Profile 3 via the quick access button and override the ISO and white balance, while in the quick access menu. Sounds far harder then it is. It’s quick easy and saves you going into the main menu searching for the items you need to change.


Setting up a camera – Part One Nikon D800

D800-Test-Birds-6If you have ever used a camera like my old Nikon FM2, then setup consisted of keeping it clean. Having a film loaded. Oh and remembering to set the ISO.

After that it was set aperture and shutter speed and press the shutter to take a picture.

Today with the myriad of menu settings in modern SLR’s it can seem complicated in the extreme.

Most cameras now how memory banks and ‘my menu’ settings or ease your way into finding your favourite settings quickly.

Well first a quick dig at Nikon. The memory banks on the D200 cannot be saved so if you are in bank A and have auto ISO switched on, then you decide to switch it off your bank A it will remember the new setting. No! Nikon this is not how we want it to work. If while working I change settings I want to be able to recall my original memory bank A settings. Not have it constantly update.

I had hoped by the D800 this would have been fixed but no.

So what settings do I use?

Nikon divides it memory banks into shooting and custom banks.  So you have to remember to change things in two places!  Not being a Canon shooter I can comment if theirs is any better or worse, but Leica not known for their abilities on the electronic’s and software did manage to get it right from the orginal M8 onwards.  Come on guys if Leica with their limited experience can get it right you should.

Lets start at the top with my four shooting banks, these are labeled:
ISO-M
ISO-A 1/800
ISO-A BKUP
CSB

First of all the four banks are about the same except for what is noted on the label comments.

The first ISO-M, is my general shooting bank with manual ISO set.

The next is for wildlife or sports. It’s configured to use auto ISO but not let the shutter speed drop below 1/800 of a second.

The third gives auto ISO and allows shutter speed to drop to x2 1/focal length, but also shoots raw and JPEG. This is set to put a copy of each raw and jpg each card. The D800 has two card slots. I normally I set the second card to overflow but for this bank is set to backup.  With this bank setting I often switch between auto ISO and manual and it’s the mode for important shoots. Generally photographing models and weddings which is why this bank puts a RAW file on each card for backup.

The last is a bank configured to the way my wife likes her camera setup for when she borrows mine.

For the Custom memory my settings are:

AF Normal
AF Short
AF Illumination
CSB Shutter AF

AF Short is the focus time out, basically how long the camera waits before trying to re-acquire focus again. Useful for bird photography when set to short.

AF Illumination is helpful in a dark studio. Apart from then I do not want my camera make extra noise or shining lights at people to assist focus.

Lastly CSB Shutter. I have the shutter button set not to activate focus for my three modes while my wife prefers to have the shutter set to focus and manual ISO only so this one is for her again.

The new ‘My Menu’ option allows quick access to what you need. What’s even better is that you can configure one of your buttons to take you to the top item in the menu.

I don’t have this on my D200 only my D800 so I am still deciding on what to have in here but so far these are what I have added.
Auto IOS
Exposure delay
Self timer
High ISO nr
Long exposure NR
Choose Image area

I have only had this camera for a week and these settings have changed somewhat over that week with testing, and I am sure they will continue to develop.