Setting up a new Machine – ICC Printer Profiles

Printer Profiles 1


Setting a new machine for Mac OS X users has always been relatively simple and iCloud continues to improve the experience, the latest version of Windows I hear have also caught up in this respect.

At the weekend I was checking my Lightroom settings and made sure that all my presets and profiles were correct.

The Lightroom presets are quite easy, there is an option to keep them with your catalogue, so you will get a setup for each catalogue or the default which puts them in your ~/Library/Application Support/Adobe/Lightroom.

Lightroom Presets


It was just a matter of copying over the folders I needed.

Checking out the printer module in Lightroom, while my presets were there, of course my printer profiles were missing.

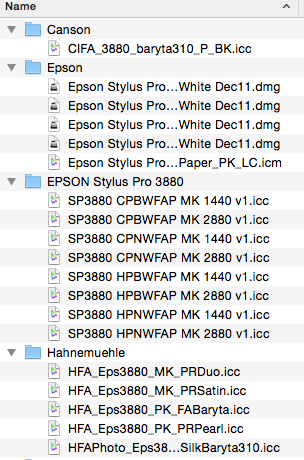
Now profiles live in /Library/ColorSync/Profiles


Print Profiles - Lightroom


I tend to create a folder under here called Papers and I move all my printer paper profiles in to that.  Some companies you just download the icc file and drop it where you want, other like Epson install it (Epson when are you going to sign your installer!).  The Epson installer creates a folder called EPSON Stylus Pro 3880 and places it directly under the Profiles folder which I move to the Papers folder.

So thats my Lightroom all setup on my new machine, with scanner, printer and monitor all profiled and setup correctly.

Hex Core Mac Pro

As those of you know who read this blog, I have been thinking hard about what my next computer will be. 

Buying high end  Mac Laptops has so far done me well. I get seven years out of them before Adobe Photoshop and Lightroom force me to upgrade. 

Looking at machines now on this website here, I am driven by the want (not need) of a smaller lighter laptop, eg a MacBook Air. 

The Air great as it is, is not really suited to Adobe heavy lifting. So instead I have been looking at refurb MacPro Desktops. 

Well after much waiting a range of MacPros from Quad core 256GB SSD 12 GB RAM to Octo core 1TB SSD 32GB models appeared. 

A mid range Hex core with 512 SSD 16GB look good and I had a good think. This was Tuesday night. 

By the time I had decided to buy it had gone. 

But on Wednesday morning one of the spec I wanted was back. A quick email to my wife to approve the purchase and I clicked buy. 

Well it arrived Thursday morning and I’ll be spending the next few days setting it from scratch rather then importing all my junk off my laptop. 

Back Side Illumination and Stacked Sensors

BSI and Stacked Sensors

For the last few years digital sensor improvements have been slow but steady.  Its hard to find a bad camera today.

The latest buzzwords are Back Side Illumination and Stacked Sensors.  The Nikon V1 was one of the first cameras to use the new BSI sensors, but what does this mean.

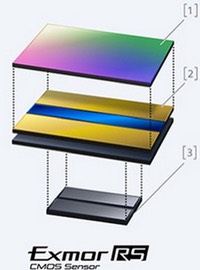
In a typical sensor you have the sensor pits, but the available surface area has also to be shared with the supporting electronics, reducing the area for light collection.  In full frame sensors and medium format the area lost is inconsequential but as the sensor gets smaller the percentage area lost increases.  BSI and Stacked sensors, basically moves more of the supporting electronics underneath allowing more available area for light collection.

WWDC 2015

WWWDC2015
Its Apple’s World Wide Developers Conference this week.  While hardware was not featured we did see the next update to iOS and to OS X.

Nothing spectacular but the multitasking updates for iOS for the latest iPads and the graphics and windowing improvements to OS X are nice additions.  If the performance updates for Adobe are real then a new Mac and the new OS may make things really fly!

The 12 inch MacBook

MacBook12Got the chance to look at the new 12 inch MacBook from Apple.  Its a fantastic little laptop, not suitable for real power work, but if all you need is Office apps, email and internet its a fantastic little road warriors laptop.

For me, I have it down to either a new 15 inch MacBook Pro or the desktop MacPro if I can get one from the refurb store at a good discount.

Getting a good scan

There are three pieces of advice I can give you for scanning.

  • Scan Once
  • Cleanliness
  • Treat as a RAW file

So what do I mean by this.

Well scanning is time consuming so do the proceedure once at the highest native resolution of your scanner.

Clean your scanner plate with a soft cleaning cloth then clean your slides/film. Once mounted in the frame clean again. Don’t be surprised that after the scan you made need to clean again and rescan.

Maximise the quality of the scan. Your not after something that looks fantastic that’s your usual editing softwares job. You are after a flat low contrast file which you can work with in a flexible way.

ScanAs you can see from the histogram this image is finishing at 232 not 255 so adjust the sliders to maximise the scan over the images histogram range.  I also give the mid tones a slight boost and also turn off sharpening and noise reduction.  Our third party tools offer far better quality and options then what comes with the scanner software.

I quickly flick through all my images in the slide/film holder setting the histogram appropriate for each image.

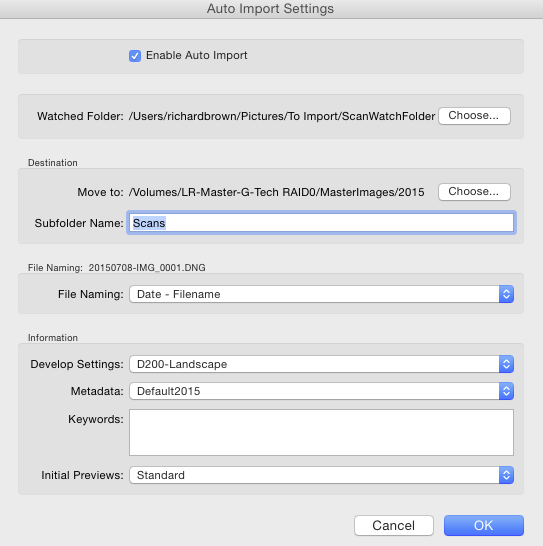
Lightroom Auto ImportI then select batch scan; I scan to a folder which I set as a watch folder in Adobe Lightroom, once each image is scanned it gets auto imported into Lightroom with my default copyright and develop settings preset I have created for this.


Updated Mac’s

Apple today did a quiet update of the rest of the MacBook Pro and iMac range.  For the most part it was a minor processor speed bump but for the new 15-inch Retina MacBook Pro, it did get a Force Touch trackpad and new PCIe-based flash storage that Apple says is 2.5 times faster.

Speed testing has shown it can get throughput up to 2GB/s.  This is serious speed and puts the MacBook Pro well above other laptops.

Software that needs CD Drives

SilverFastOne of the things I was pleased to see about my new scanner was that it included a copy of Silverfast Scanning software.

As usual I downloaded and installed the Epson drivers then downloaded the Silverfast software and installed it.  It was at this point I hit a problem.

When I entered the license key it would not accept it.  You had to have installed from the CD.  So what if you have a very modern computer.  My Mac is seven years old and has a CD drive, but my wife has a modern Mac with no drive.  My work laptop is a new Lenovo machine which like a lot of current machines also has no CD drive.

Well Epson did include a note with a URL to go to if you have a machine with no CD drive, unfortunately the URL did not work.  After a little digging I found that if I registered the serial code listed on the CD of the Silverfast software I could then request a CD less upgrade code.  This I did which then meant I could register the software and start using it.

In this day and age where people are moving away from physical media they really need to make this easier.

Instructions and software

Over the last few year computer and computer accessory companies have been getting better. Clearer instructions and simpler more straight forward software. 

Epson printers have for many years been excellent products but with poor instructions. Of late and certainly with my Epson 3880 they were much better but it seems the scanner department still have some way to come. 

Lots of bits of paper but no real single simple setup guide. 

I was very pleased to see as well as the Epson software a copy of Silverfast and iOne profile targets. 

As is usual for me I ignored CD’s and downloaded the latest versions from the web. This led to other issues which I’ll detail later in the week. 

iCloud Login Prompts

After rebooting my Mac recently I have been getting an iCloud login prompt pop up. It would not accept my credentials so I just had to cancel it. 

All the iCloud functionality still worked. Eventually I got fed up with it and had a quick search on the net to see if any one else had the issue and if there was a fix. 

Well it turns out quite a number of people had the issue but the fix was very simple. Just go into your iCloud settings, logout then login back in. Problem solved.