Portrait Post Production with Adobe Lightroom and Photoshop Part 1

If you shoot jpeg then what you get out of the camera is generally pretty good.  If you shoot RAW then what you get out is generally not as good looking straight out of the camera, unless you use the Camera manufactures own RAW processing software.

Most of use prefer something a little easier to use and more powerful, such as Apple’s Aperture, Adobe Camera RAW and Adobe’s Lightroom.

RAW files thought have far greater potential and can be processed to give a better image then with jpegs.

The image above is a RAW file taken straight from the camera, with Adobe Lightroom’s default settings.  There are a few blown highlights and the colour temperature is a little low.

It does not take much to tweak the exposure and colour temperature and apply a little sharpening (Sharpening is a topic for another day).

What we have above is much closer to what I saw in the studio.

For many people this is how the photograph ends.  The next steps that can be taken are what many consider to be steps to far.  A betrayal of true photography.  What many people do not know, is that while the next steps have become easier with products like Adobe Photoshop, these techniques where possible in the darkroom and have been with us now nearly a hundred years.

We now have a number of options available to use.  Everyone even the most perfect of models has small imperfections.  A good make artist can make all the difference, but even then things get missed, or the make is either under or over done.

The healing brush to the rescue.  Lightroom and Photoshop both have healing brushes but as I intend to do things with this image that Lightroom cannot do easily I took the decision to take the image into Photoshop.

Using photoshop duplicate the layer (Command-J on the Mac), don’t work on the original layer.  In the above image using the spot healing brush with the mode set to normal but with content aware switched on (CS5 not available in previous versions) the major imperfections in the skin have been removed.  Use a small brush, just bigger then the spot your trying to heal and remember to use a soft edged brush.  If your working on an area close to a boundary like an area of skin next to the hair or the dress, it can make the image look worse.  If this happens just undo and switch from the spot healing brush to the healing brush.  Select from an adjacent area (Option-Click on Mac; Alt-Click on Windows), and then click on the area to heal.  For larger areas, then you will need to resort to patch tool, but be careful to prevent reoccurring pattens from forming.

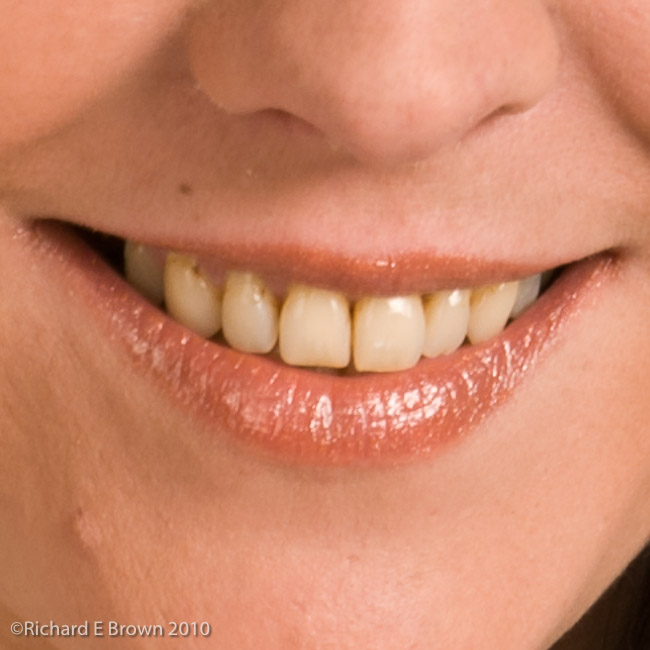
So with the major imperfections corrected the next step is skin softening, a topic mired in controversy.

There are two major options available to us.  Do we want perfect  flawless skin or something a little more natural.  Both techniques can be taken too far and remove all the texture but one tends to obscure skin texture more then the other.

Part 2 will look at this and use the most controversial technique. Skin blurring.


Want to learn photoshop and learn about these techniques in more detail, then check out the Podcast “The Photoshop Guys” and also the website Kelby Training, well worth subscribing to.

Motorcycle Riders Be Aware

Summer arrives and motorcyclists hit the road, most have not ridden since last September, and as soon as the warm weather arrives they decide to leave their armoured leather jackets and trousers at home, and they ride around in jeans and T-shirts. I have even seen people in Shorts and Flip Flops!

Don’t!

There is a reason it’s called skin graft season.

For more riding tips check out:
Ride it like you stole it!.

Playing with Light – Part 3 Hard Light / Soft Light

When it comes to studio photography, there are a lot of terms thrown around.  Some of the more interesting are:

  • Hard Light
  • Soft Light

What is Hard Light, what is Soft Light?  In Physics light has a frequency (colour), Intensity (brightness) and direction.  These are the only things a photographer is bothered about.

But then we get the sales pitch: Light modifies, to shape the light, make it hard, make it soft, give it wrap!  These are possibly meaningless terms, and I have had many a debate with photographers over the purpose of light modifiers.

Studio photographers want light that makes their subjects look their best.  In general we use terms like soft light to describe this.

Take a naked flash head, place it at one end of the studio.  Place your model at the other end and shoot.  The result is hard flat light.  Totally even light across the subject and boring.  Yes you can produce a good photo but its difficult.

But lets turn this around, hard directional light coming from behind the model, what does that give us?

In the picture above, we have a flash head fitted with a snoot.  Hard directional light coming from behind the model, the light is just hitting her.

Interesting and dramatic.

Possibly not to everyones taste but I like it.

What about soft light and wrap?

Fitting something like a softbox to the flash head is the recommended option to give soft light.  How does this look.

Well something to remember is, if we go back to the first scenario.  Flash head with softbox fitted at one end of the studio and model at the other.  What is the result, well to be honest not much.

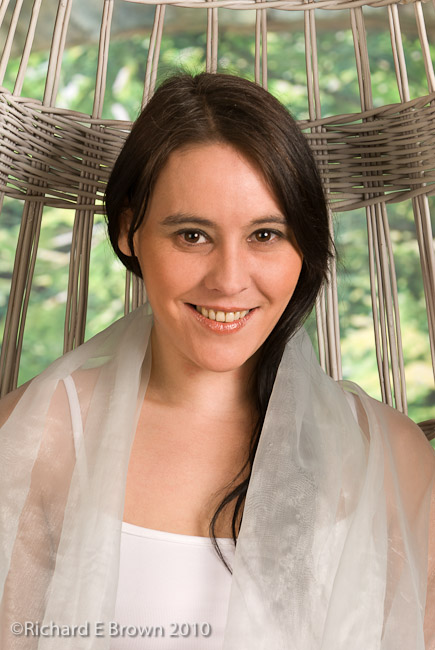
The key to using a softbox is to get it as close to the subject as posible, this then gives the effect termed soft, and also wrap.

This is where the inverse square law really comes into place.  With the model so close, you have a huge source of light flooding onto your subject but as the distance increases from the light source the light drops of quickly, giving wonderful soft shadows.

What also helps in this shot above is the large aperture used on the lens to limit the depth of field available.  A very beautiful model enhanced by some lovely soft, wrapping light.

Playing with Light – Part 2

Another day in the studio.  More playing with light.  Single large softbox with a white paper background.  The paper is unlit, just what is spilling from the single softbox.

A very simple shot, not to challenging.

Today was very hot and humid, and with no air conditioning in the studio, it was very tough for the model.  The lights still generate heat and even with all the fans going, Dani and myself were both dripping in sweat, which meant lots of breaks while Dani re-did her makeup.

Even so I had to do some work in photoshop to remove some of the excessive shine from the skin.

When the conditions get tough, remember your model, it is hard work hold poses in heat and humidity under hot studio lights.  Let your model take lots of breaks, ensure they drink plenty of water, and in the breaks you can re-adjust the lighting, and they can re-do their make-up.

Playing with Light – Part 1

Tonight a very short blog post.

Its been another busy day for me. Over the last week I have been enjoying myself in the studio. A mix of shoots for clients and a few for fun shoots for myself.

Above is a very simple shot of the lovely Artemis. She is a fantastic art nude model who I was photographing today.

Most of the work we did was art nude, and high contrast. Most of which will not be shown here as I try to keep this blog family friendly, but I also shot some fashion and pretty glamour.

Lighting in these shots is key. You can keep it simple and easy on yourself, a couple of softboxes giving a even flat light or go for something a little more dramatic.

The shot above is lit with just a simple single softbox. Positioned fairly closely to the model, this gives a very pleasant soft light, with a quick drop off, increasing the contrast.

PhotoSmith for Lightroom 1.05

Well the other day I installed the latest Photosmith the Adobe Lightroom companion for the iPad.  I also updated the Lightroom plug-in to 1.0.10.

Caroline had been shooting some macro shots of flowers and local wildlife (mainly Damsel Flies, and Toads), so I borrowed her compact flash card to test the update.

I am please to report that it worked perfectly.  I imported the photos, keyworded a few.  Added some location information to one, and rated them and colour rated them.

I then tested the sync, and wirelessly imported them back into Lightroom.  I then made a few changes, sync’ed common information across all the photos and resync’ed again.

This information was then transferred back to the iPad.  During the day in spare moments I continued to update the metadata and keyword information on the iPad, and at the end of the day sync’ed again.

I am pleased to report PhotoSmith worked perfectly and can be well recommended.  Now we are just waiting for the batch syncing of metadata, and for me the killer feature, two way sync of photos, so I can take a shoot from the Laptop to the iPad, do some work then sync back.

Exposure and Metering

I have been following a discusion on Frank Doorhof’s blog about metering in the studio, and whether a handheld meter is necessary, if we should just use the histogram, or even if there is a correct exposure and that it is subjective.

Here is my view, so feel free to disagree.

When in the studio using studio strobe, a hand held meter that can take an incident meter reading is essential.  Why?

Well for one thing, to produce an accurate, repeatable and true to life as possible rendering of the the final image.  If your employed to take photographs of some clothes, then the fashion designer would not be happy if you changed the look of his clothes to suit your own artistic designs.  What the customer would want is an accurate rendition of his clothes.

By metering accurately with a meter calibrated to your work flow you will get accurate results and it is repeatable.  If you asked to reshoot some parts, even if you tore your studio lighting setup down, you can quickly set it back up again and get it right with the meter.

When out shooting landscapes then I also often use a handheld meter, essential when I shoot medium format, as my medium format camera has no meter!


The Boat House

But when shooting landscape, I am less interested in an accurate exposure, more on an exposure that will give the picture the mood that I feel fits.  If the dynamic range of the view exceeds that of your camera then often its less about exposing correctly and more about choosing an exposure that will capture the detail you are most interested in.

Though here a neutral density filter or two can really help, or resort to HDR or digital blending by bracketing your shots.

More Nature – Insects, Grebes and Coots

A busy weekend indeed.

First up a trip to Hartsholme on the Saturday morning. Meeting Chris to see how the young baby Coots were getting on.

We found it interesting in the amount of effort the parents were putting into renovating the nest. Possible getting ready for a second brood?

We only spent a couple of hours there, things were pretty quiet but it was good to see how the baby Coots were progressing.

I spent Saturday afternoon in the studio. First doing some portraits and then some product shots. I’ll be processing these over the next couple of days and then passing the initial edits on to the customers. They will make their selections and i’ll then do the final editing of there chosen shots.

Sunday afternoon, we spent walking round Whisby Nature reserve. Caroline was shooting Macro and I was using a long telephoto zoom. Occasionally we would swap bodies when something caught our eyes that needed the others lens.

The bright brilliant blue of a Damsel fly caught my eye, so I took a few shots of those, using the macro lens and macro flash. Once at the lakes we managed to get few reasonable shots of a pair of Tufted Ducks and some Great Crested Grebes. Walking back we spotted several small toads crossing the path, then a family of ducks followed by a rabbit.

All in all a pleasing way to finish a very photogenic weekend.

Metering in the Studio

Sekonic L 758 Light Meter

I learnt some time ago not to trust the the histogram.  How you customise the camera affects the histogram, and in a studio, when using high key or low key lighting the background overpowers the rest of the scene affecting the histogram.

Recently I was watching a video on Kelby Training by Frank Doorhof called “Why Fake It When You Can Create It”.

In it the fashion photographer Frank Doorhof covered some aspects of metering in the studio using a flash meter.  Great stuff, and I cannot recommend it enough.

Gives me a few ideas to try out when I am in the studio tomorrow.