Solid State Disks are the way forward

Macbook Air -top

A few years ago Apple started to offer the option of SSD’s instead of a hard disk. Costs were very high, people blamed the ‘Apple Tax’ but early SSD’s with good performance and that worked correctly with the OS were few and far between. Most of them had maxiumum capacities of 64 – 80 GB’s not a lot for your main laptop but certainly an option for the new Ultra Light Laptops that Apple pioneered with their Air Range.

Now most manufacturers offer the option of an SSD and in the capacity of 120 – 250 GB they are getting quite affordable.

The little Macbook Airs now only come with SSD’s and the top of the range MacBook Pro can have one at 768 GB!

Last weekend I finally got to have a go with my wife Caroline’s MacBook Pro Retina, this 15″ Retina with 16 GB of RAM and a large SSD is a real speed machine, and I was amazed at the improvement it made working with large files in Photoshop.

My MacBook is the original 15″ Unibody from 2008, its little 320 GB disk is nearly always close to full so I decided to bite the bullet and upgrade, not by buying a new laptop but by getting a SSD to replace my old Harddisk.

The 2008 model is very easy to upgrade, simply open up the battery access panel and there staring at you is the battery and hard disk.

First you need a SSD, I took the easy option and just asked Crucial the memory company for a compatible model at 512 GB in size.

Once it arrived, I took a full time machine backup and also cloned the disk to an old external with a neat piece of software called SuperDuper.

If your using a version of OS X that was released from the app store you will also need some installation media. I have blogged before on how to create a bootable Install disk but in case you missed it you can find it here.

OS X - Ten Years Ols
OS X – Ten Years Old

So with your laptop all backed up, you need to assemble your tools: a bootable OS X install disk, the new SSD and a Philips 00 Screwdriver and a T6 Torx Screwdriver.

Shutdown the laptop and turn over. Taking suitable antistatic procedures open up the access panel and remove the battery. Then with the Philips screwdriver undo the three screws. Carefully remove the drive and undo the cable.

You will now need to remove the four T6 screws in the side of the old hard disk. Once removed put them into the new SSD.

Connect up the cable and insert the SSD, bottom edge first being careful of the cable. Fasten in with the three Philips screws and put the battery back in. Put the access panel back and you are now ready for the fun bit 🙂

Connect up the power and also connect up your OS X bootable device. It’s now time to switch on and let the computer boot from your install media.

Choose the disk utilities option and format the disk. You can then do a fresh install of your OS. To get your data back you can either use Time Machine or just reinstall and copy your data back.

Its been over seven years since I have done a totally clean install so I thought it was about time. Finding all my software and licenses was fun but it was not long before I had a super fast MacBook Pro.

If your interested in installing an SSD do make sure its supported and also check the firmware revision. Mine did not ship with the latest firmware and some firmware has issues with OS X and Windows 8. Find a firmware that is supported and upgrade.

The firmware upgrade is straightforward but I’ll cover that another day.

OS X - 10.8.0 Mountain Lion

If you want a clear article on doing this and many other simple computer jobs, check out the ifixit.com website. You can find an article here on the MacBook Pro upgrade I undertook.

Adventures with IE6

Macbook Air -openThis good Friday we had an invite to visit Caroline’s sister, Angela in Chesterfield.

We also had a little chore to do.  Get Angela’s ‘new’ desktop computer up and running.  This was an old Windows XP machine that Alan, Caroline’s farther no longer needed.

First job was a booting problem, quickly diagnosed to be a flat motherboard battery, which was easily fixed.

Then getting it on the internet, this proved harder then expected.  Angela’s Wifi supported and was using MAC address filtering as an additional security measure.  Unfortunately the old wireless router’s management software only supported IE6.  We tried Safari on the MAC, the iPad and Firefox, but none were supported.

In the end I ended up booting up an old VM of Windows XP that I happened to still have sat on an old external harddisk that was sat in the bottom of my computer bag.  Lucky!

With the VM booted up on my Mac it was soon in IE6 and logged into the router to make the necessary modification.

Back in the day when Microsoft’s IE6 was the leading browser more often then not software was specifically written for it.

Luckily today most things are a little more standards based, so no matter if your using the latest Microsoft Operating System or a Mac running OS X, even other flavours of UNIX and LINUX; we can all work together.

SplashID.bundle Error in Safari

Screen Shot 2013-03-11 at 21.58.17 
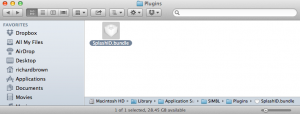
For a while now, every time I started Safari I would get an error message warning me that a plug-in was not supported and would be disabled.  The plug was SplashID.bundle.

I have searched for this plug-in but up to now have been unable to find it.  I tried the usual plug-in directories in the main /Library/Internet Plug-Ins and the users library ~/Library/Internet Plug-Ins.

Screen Shot 2013-03-11 at 21.58.50

Finally I have now been able to find it, delete it and get rid of the error message.  It is in fact located in /Library/Application Support/SIMBL/Plugins and called SplashID.bundle

Apart from this irritation, I have found SplashID a very useful password manager on my Mac and my iPhone.

Adobe CS6 & Lightroom V4.3 Released – Now with Retina Support

I was pleased to see that the much anticipated Adobe updates to support the Mac Retina displays were released today.

I cannot provide a lot of feed back yet, as I will need to prise the MacBook Pro Retina out of my wife’s hands in order to test.  Maybe I can get her to make a blog post about what she thinks to the updates?

Low Sun and thoughts of Winter Landscapes

After the intense rain of the last couple of weeks, it been lovely to be greeted with bright blue skies the last few days.  With the low sun its been a difficult commute into work but with the improvement in the weather my thoughts have been on winter landscapes.

So with that in mind the mapping applications have been coming out and I have been looking at where the sun will be and where the tide will be over this weekend, as I feel a large format trip over to Whitby is in order.

If we pop up on the bike i’ll just be taking the Leica M4, M8 or Nikon V1, but if we go by car then it will be with my biggest heaviest tripod and the Ebony Large Format Camera.

If your interested in Apps for photography have a look at ‘The Photographer’s Ephemeris’ not a cheap app but very useful for looking at where the sun and moon will be at a particular location on a particular day, better on the iPad then on the iPhone.

WordPress – Stuck in Maintenance Mode

WordPress is extremely reliable, and far easier then maintaining a standard website.

For the first time these weekend I had an issue with it.  I have a test site which is a duplicate of my main site, and whenever I upgrade a plug-in or WordPress itself, then I test first on my dev site.

I needed to update a plug-in on this site but WordPress got stuck in maintenance mode.  A quick web search and I soon found the solution on WordPress’s support section.  When the site goes into maintenance mode it creates a file in the root directory called “.maintenance”, this prevents the site being accessed or administrated, in order to login again you need to ftp into your site and delete this “.maintenance” file.

As with most things easy when you know how.

Kodak Sensors – Truesense announce m4/3 sensor

As many of you are possibly aware Kodak over the years have produced some great and class leading CCD sensors for digital cameras.  Many of these are used in Medium Format Cameras and in Leica M Digital cameras.

With the troubles that Kodak have been having, they sold off the sensor division and its now know as Truesense.

They have recently made some interesting announcements, first they are going to produce some m4/3 sensors and a monochrome only sensor like that in the Leica Monochrom.  The bigger surprise is that these are going to be CMOS based sensors, so we will also get video and live view.

I doubt any of the main stream camera manufactures will pick up the monochrome version, its mainly going to be used for scientific uses in specialised areas, but maybe one of the small players or a new upstart may produce something with this for the enthusiast photographer.

Creating a Mountain Lion Install Disk

It was with some degree of controversy that Apple released OS X 10.6 and a download only.  Many people wanted the physical media, something I well understand.

With Snow Leopard and then Mountain Lion, I never got round to creating a bootable install disk, but I am thinking of upgrading my hard disk and putting in a solid state disk to replace my current traditional hard disk.

Creating a disk is not hard but does require a degree of patience.

The first job is to get hold of the install files. Not as hard as you might think.  If your have not bought it yet then just purchase it from the App Store.  If like me you purchased it sometime ago, you will find the install will have deleted itself after use.  Just Option-Click in the Store to re-download it.  It will download into your Applications folder.  I suggest you save this file into a safe location.

To make the re-install faster, I am creating an bootable external hard drive.  Launch Disk Utility and create a 10 GB partition.

Make sure you make it a GUID Partition, via the Options button, on my disk above, I have a small 10 GB partition for the Mountain Lion Install, a small Window partition and then a native OS X partition.

Right click on the downloaded Mountain Lion Install file and select show package contents.

Browse to ./Contents/SharedSupport/ and Open InstallESD.dmg, this will mount the image.

Now go back to Disk Utility and select Restore;

Now drag the newly mounted image into the Source box and then drag your destination Disk Partition into Destination, then just click restore, depending on the speed of your disk you will have a bootable disk within a few minutes in which to use for rebuilding your Mac.

Finally to test your disk, go into System Preferences, and select Startup Disk, then select your new Disk Partition to boot from.

Easy, when you know how.

Apple’s Announcement

This morning while everyone was waiting for the expected announcement of Apple’s iPad mini. I sat down and wrote the first half of this blog post, with what I though would be announced and my thoughts.

I have a full sized iPad so the mini does not interest me, I was more interested to see if the new iTunes would be announced, it is more then due a rewrite. Originally just a program to manage your music, its grown into a media manager to look after your songs, music videos, movies, books and even games. An extensive shop and lets not forget podcasts,radio, and iTunes U.

The other thing I was hoping for was an announcement of the 13″ Retina MacBook, while also a product I am not interested in, the smaller retina screen and whatever graphics hardware is needed to drive it, is something I would like to see in the smaller 11″ Air.

So tonight I fired up the iPad and watched the live stream of the event.

First up was the new iBooks, this was not a surprise as the new ePub standard was announced earlier in the week.

Then the new 13″ MacBook; tempting for travel but for now I am going to hold out for a MacBook Air. No updates to the Air though, hope there going to get the retina screen soon.  Even if I don’t buy that it will mean I might get the current version cheaper.

A bit of a surprise was the new iMac, lots of improvements but the lack of a DVD drive may put some off.

Then the big surprise of the night an updated iPad, basically the hardware from the iPhone5 but with even more Graphics performance.

Then the main event the iPad Mini. Not as cheap as people were expecting but then Apple do not do cheap they try and do quality!

No announcement yet of the new iTunes but it is expected this month.

So did Apple deliver what you expected?

Lightroom V4.2 now available

Adobe released Lightroom V4.2 yesterday.  I backed up my database and upgraded, no issues.

This morning I also found Adobe Camera RAW 7.2 update available for Photoshop.

The underlying RAW processing engine in Lightroom and Camera RAW is actually the same one.

Pros will be glad to see Adobe now supporting the new Leica S Medium Format; and if anyone buys one, the new Nikon J2 is now supported, though with the superior Nikon V1 now available cheaper, I doubt it.

For more details check out, Chris’s quick review and Adobe’s official release pages.

www.cbphotoblog.com

blogs.adobe.com/lightroomjournal