When shooting Landscapes on Small Format, I expect my technique is similar to most SLR users.
Modern Digital SLR’s have great dynamic range and we snap away generally trusting in our modern matrix metering.
A quick glance at my histogram is usually enough to see if my exposure is in the ball park. I tend to follow the digital mantra ‘Expose to the Right’, but I try not to over expose or clip.
Unlike film, digital at the extremes of the black and white points is a cliff face. There is nothing below 0 and nothing after 255 in our binary capture world.
I know the recovery slider in Adobe camera RAW and Lightroom can bring back a surprising amount of detail, but this is detail held in your capture, your not really recovering anything.
When my exposure looks bad it’s here I either reach for the Exposure Compensation Button (I usually shoot in Aperture Priority). In really tricky situations I use my camera’s spot meter.
If the dynamic range of the subject exceeds my camera’s dynamic range, then I generally bracket my exposures. Once back home I then resort to HDR or digital blending, sometimes both. Products like Photomatix Pro and of course Photoshop make HDR very easy now.
Getting it right in Camera is always the holy grail, to this you have to resort to careful metering.

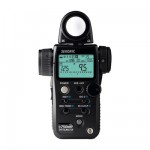
If using my medium format camera, then this would be with my handheld spot meter. I actually start with an incident meter reading first, this usually puts me in the ball park. With the meter in its incident mode, you place it in the same light as the subject you want to photography, and point the metering dome at your camera and take your reading.
I usually have my meter set to EV readings. My Hasselblad has markings for EV and an EV lock, so I can set the exposure then adjust my aperture and the shutter speed will automatically change to maintain my set EV reading.
This incident reading is my starting point. I then try to determine the dynamic range of the scene. First of all I try to find the brightest part in the scene, once found I set this in the memory of my meter. I then try to find the darkest part of the scene. Once again this gets set in the memory of my meter. I then hit the averaging button and note the average. This is usually close to the incident reading if the dynamic range is now too high.
With the meter in averaging mode, you can then meter around the scene with the spot meter, and it will display the how many EV’s above or below the average that part of the scene is. You can then ensure the important parts of the scene is exposed correctly and will maintain detail in your photograph.
With my meter, it has a clever trick in averaging mode. It displays a graph at the bottom showing your lowest and highest reading, together with the average. Now that is not the clever part, the clever part is that I can upload from my computer custom Dynamic profiles for different cameras, films, and for each iso. So on the meter you can select your camera or film and the meter will show if your exceeding the dynamic range available, and you can then adjust your exposure as needed.
If you are exceeding the dynamic range then the choice is to allow what you want to go back/white. With your meter you can easily determine what that will be and make an informed choice.
Often at this point I will often bring out the filters. A one to two stop gray graduated filter usually drops the dynamic range by enough to resolve your issues.
