
Great commute to work today, we are back on the BMW.
My local dealer collected my beloved GS on Tuesday night and called me on Wednesday to say she was all fixed.

Family, Photography and other misc news
Great commute to work today, we are back on the BMW.
My local dealer collected my beloved GS on Tuesday night and called me on Wednesday to say she was all fixed.
Living in Lincolnshire close to Lincoln, one is blessed by being close to some of the best medieval architecture in Europe if not the world.
Being a member of English Heritage and the National Trust one gets free entry into some of the finest buildings and landscapes this fair land has to offer.
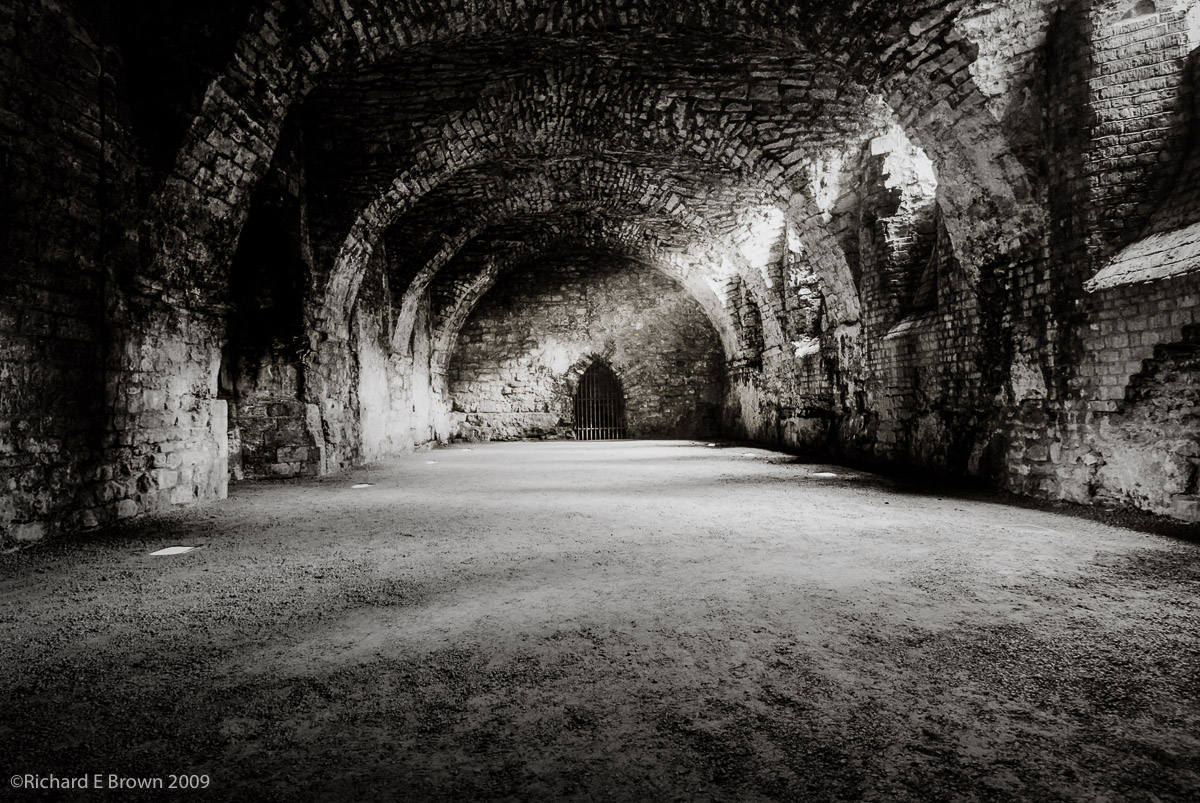
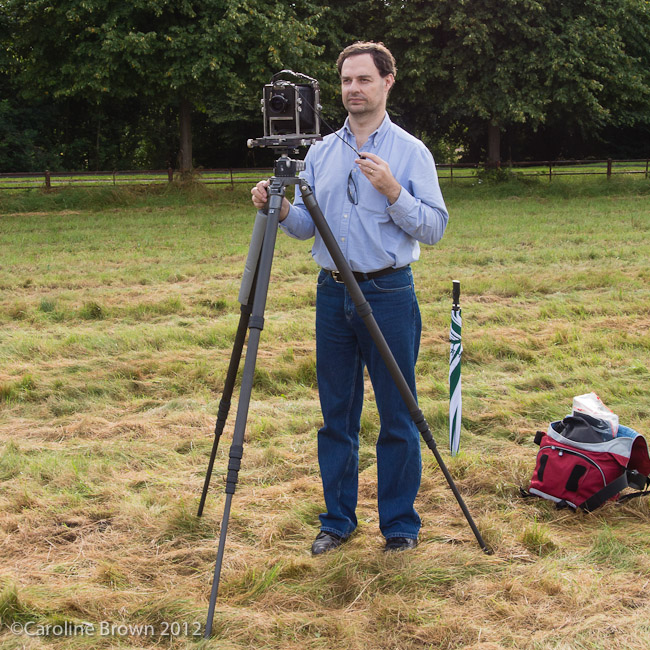
I have on several occasions visited the old Bishop’s Palace in Lincoln, its now mostly a ruin but worth a visit. A few years ago I took my Digital SLR and a heavy tripod and took some photographs of the oldest part of the buildings. Being careful I captured the best quality image I could.
Now the image I had in my mind and could half see was of this ruined chamber with beams of light flooding in.
The camera captured none of this, the emotion and majesty was mostly in my mind created from the image the eye captured and was nothing like what the camera captured.
Over the last few few years my skill with Adobe Lightroom and Adobe Photoshop has grown and the image I took a couple of years ago, I keep revisiting, re-editing the raw file, trying to capture the image I have in my memory that the camera was unable to capture.
I may be proud and boastful but I feel I am a master of Adobe Lightroom V1 to V3 I knew it as well as anyone and now I am getting that way again with Adobe Lightroom V4 and now V5. The raw development engine changed a lot and my techniques have had to change too.
With the monster that is Adobe Photoshop I am less skilled but often its only with a good knowledge of layers and curves that one truly masters that product. I would say that I am now an advanced amateur in Adobe Photoshop at least with, layers and curves, which is a tiny part of the huge product that is Photoshop.
With these new skills I again this weekend went back to the original raw file I took those few years ago and re-edited it from scratch.
With my new skills its now much closer to my original vision and memory.
While not perfect I will share it with you, it looks better as a print but it is certainly approaching what I had in mind that day.

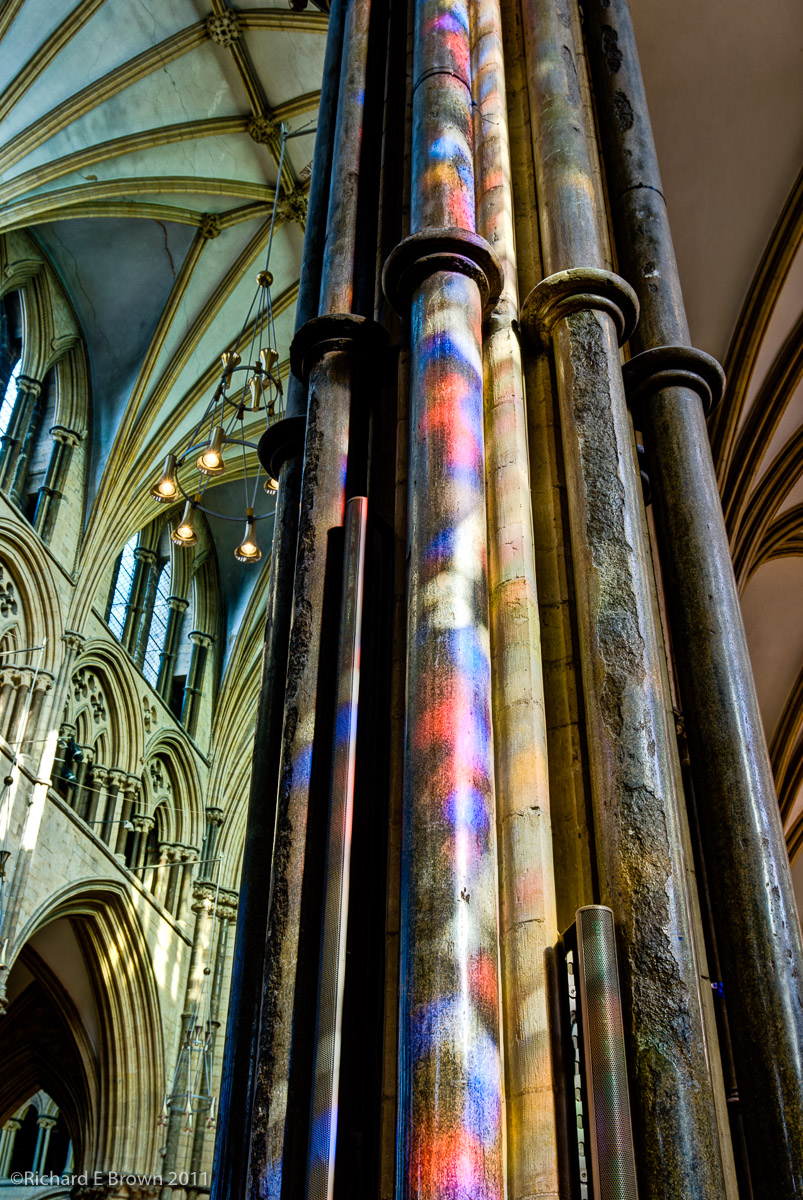
I have a number of long term projects underway, one of them involves a near monthly visit to Lincoln Cathedral.
While there in the winter time you get beams of coloured light flood across the cathedral its something I feel I need to explorer some more.
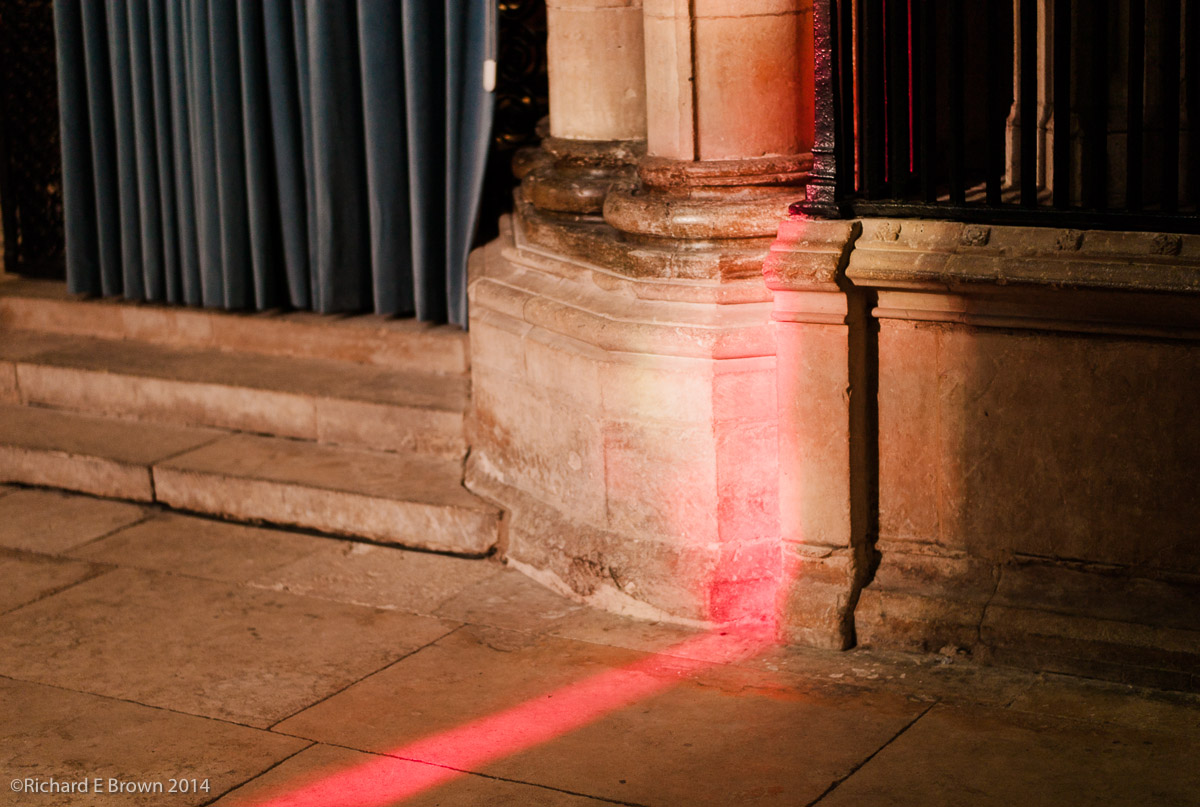
This month there were dramatic red beams of light flooding across the Cathedral floor.
I first saw light pattens like these and other more complex ones a few years ago and this led to the dramatic image below.
Winter often produces poor weather and dull days, if you have any buildings with stain glass windows and the low sun comes out, pay a visit and try to capture the amazing light that can sometimes illuminat these buildings.
Well it’s rare but occasionally modern vehicles do break down.
Our BMW GS developed a fault this morning making the attempted commute to work. It would die when we turned right.
Sounded like a broken ignition wire. We managed to get home again and I called BMW who are collecting the bike next week. So we are car users for a while.
Quick shout out for Astle BMW Grimsby and their bike service department who where very helpful this morning to sort me out.
This week most of major camera manufacturers seem to have announced new models.
One of the most curious recent announcements (ignoring the Hasselblad rebadged Sony’s) is the Sigma announcement whether it works I don’t know but you can read about it at the usual review sites and here at gearophile.com.
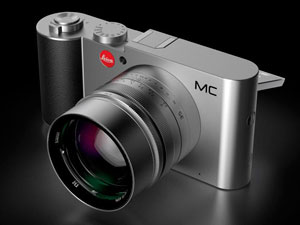 Everyone it seems wants a mini Leica.
Leica make the best glass in the world. I own the 24mm, 35mm and 50mm Leica M lens, I admit they are expensive, they are manual focus but they are small and perfectly formed jewels.
I bought my first two years before I bought my first Leica, it was a risk but has turned out to be an investment. I suspected I would eventually succumb to the micro four thirds cameras, and I know many people who use Leica lens on their Panasonic and Olympus micro four third cameras.
I have not yet bought a Micro Four Thirds camera but have bought a film M4 and a digital M8. Many people would dismiss technology that old but thought it has taken me over a year to master the art of developing a digital RAW file from the M8 I can now produce an image that at base iso rivals even the best that modern cameras can produce. The M4 film camera was an emotional purchase, its a camera made the same year I was born and gets used as a fun toy rather then a working camera.
So while Leica cameras have always been somewhat second best compared to their rivals (some may disagree), the lens are excellent and are hard to beat. What people want is a modern Leica camera to use their Leica glass on. The M9 is a great camera but the range finder experience is not for everyone and takes regular practice to be able to focus accurately and the CCD sensor while capable of stunning sharpness and a more natural film like grain cannot match modern sensors with there high iso capabilities and live view features.
People want the holy grail, a real Leica, autofocus, all mod cons and be compatible with Leica M glass. Oh and Cheap!
When the Leica Mini which turned out to be the Leica Vario people hoped that this was going to be the answer to their prayers; well now there is a new rumour brewing the Leica T, is this finally going to be the Leica that people wish for?
Its been a gusty few days; over the last few months its been storm after storm here in the UK.
Railways washed away, harbour walls broken and ships sunk. At least here in the UK we have not yet had the snow and cold weather that our American cousins have had to put up with.
As someone that commutes everyday by motorcycle, I’ll post one of my regular reminders to four wheel drivers, please take care when motorcyclists, scooter riders and cyclists are on the roads in these high wind, give us plenty of room as you never know when a gust of wind may carry us into your path!
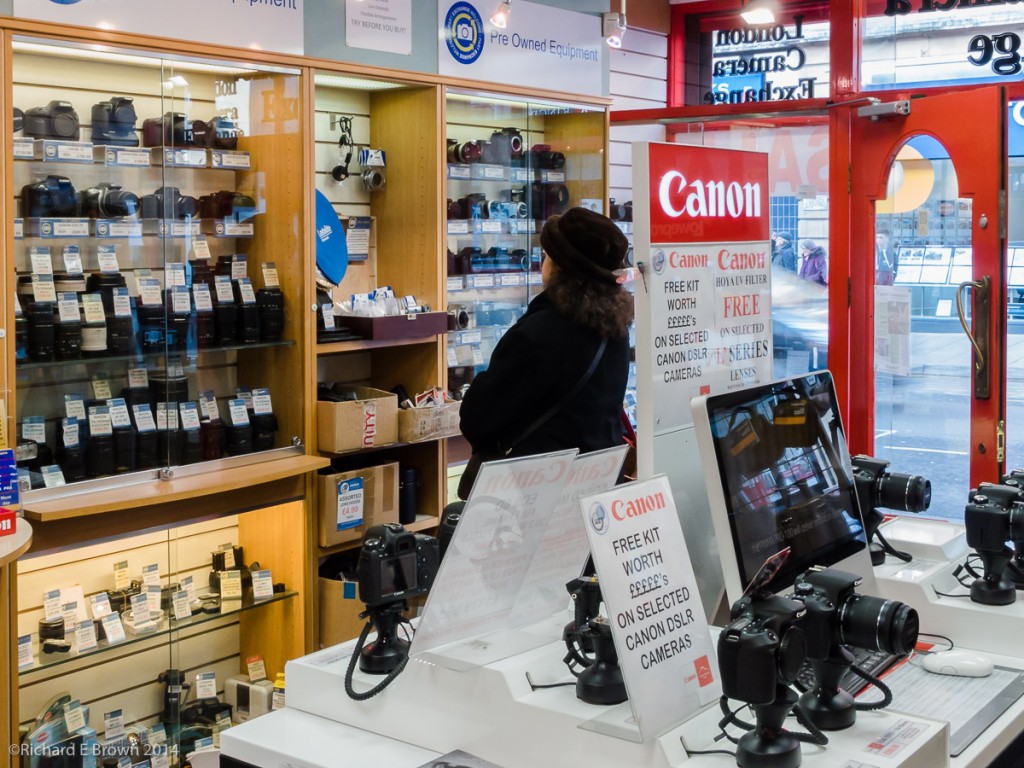
 Yesterday I popped into my local London Camera Exchange. The aim was to have another play with the Panasonic LF1 compact.
I had with me my Nikon V1 with 10mm (28mm equivalent) so I could compare sizes.
As was expected size wise the Panasonic won, its much smaller then the Nikon or the Fuji, its a real shirt pocket camera and one that you could easily carry all day every day. With its small sensor its not up to the quality of the Nikon 1 series or Fuji but then it does not try to be. With a good zoom lens its one of the better small compacts around.
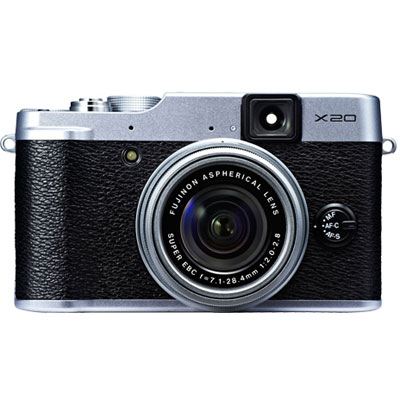
As they had one in the store I also tried the Fuji X20. It seems better made then the X10, and the big issue I had with the X10 was the lack of information. When using the viewfinder you had no idea where it was focusing or what it was doing.
The new X20 fixes these issues with information displayed onto the optical viewfinder, even indicating whether it has locked focus and where. There are two issues with the Fuji, first the sensor is smaller then my Nikon V1 but much bigger then the Panasonic, and the view finder is only 85% representative of the actual image being taken so you must remember to frame looser.
The ergonomics were excellent much better than my Nikon and better than the Panasonic, it is much bigger than the Panasonic, in fact its the same size as my Nikon V1 with the 10mm (28mm effective field of view) lens fitted but it does have a decent fast zoom. Of course my Nikon has interchangeable lens and the lens are small and pocketable, the entire outfit of 10-100mm (28mm-300mm effective field of view) can be carried in a jacket pocket makes the outfit much more flexible but sometimes you just want to carry a single camera and lens. Its here that cameras like the Fuji X100s, X20 etc have many advantages, still I have not written off the Panasonic yet, its a camera that can be carried all the time and I would likely have it with me, even when I am carrying my Leica outfit as its so small. The lens range of 28-200mm also makes it very compelling despite the small sensor and low quality EVF.
Its also worth considering older cameras. The Panasonic retails at nearly £300, a second hand Panasonic GF1, EVF and 20mm f/1.7 can be had for that price.
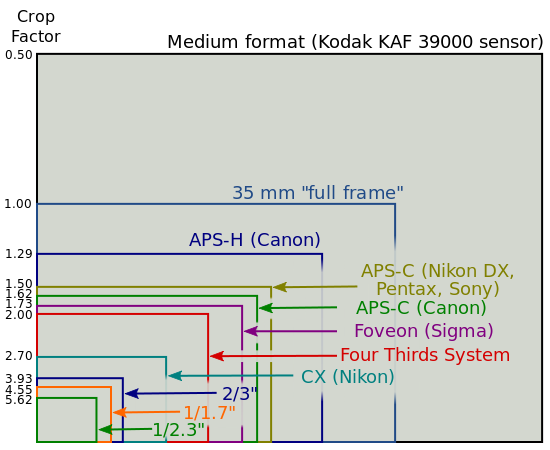
 One of the advantages of mirror less cameras is that there is no need for the space for the flapping mirror and pentaprism. This means a smaller flange distance so retro focus lens are not required (though most modern lens are), so lens can be smaller and less complex but give potentially better image quality. No moving mirror means less likelyhood of camera shake, plus without the hump on top housing the pentaprism the camera can be smaller.
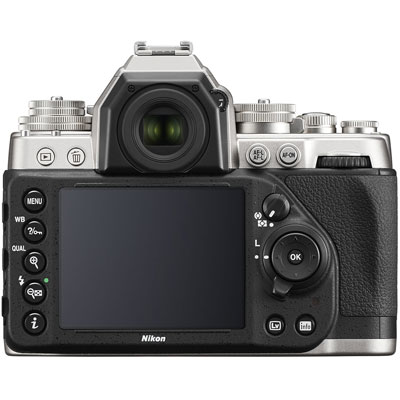
The camera just above, the Nikon DF is about as small as you can make a full frame digital SLR with traditional optical viewfinder because of the need for the mirror and pentaprism housing. So why with the current batch of mirror less cameras are companies like Panasonic, Olympus and Fuji sticking a fake hump on top making the cameras bigger, is it hump envy, do they feel the need to look like ‘real’ cameras or is there a valid design reason?
By the way if you want to see a ‘real’ camera check out my Ebony below:
I keep looking at small compact cameras. Currently my compact camera is a Nikon V1, this is a little large but its large 1 inch sensor is huge for a modern compact and is only matched by the new Sony Cyber-Shot RX100 II. I keep looking for a replacement for the Nikon V1, buts while the ergonomic’s drive me mad its difficult to find a single camera to replace it.
I am drawn to the Ricoh GR with its large DX sensor. This has no ordinary compact, its highly customisable and has a huge DX (APS-C) sensor but no view finder and a fixed lens.
Most little compacts like the Canon S120 have only the smaller 1/1.7″ or smaller sensors and no viewfinders but do have decent zooms giving flexibility.
Its with these thoughts I have been looking at the Panasonic LF1. The big thing is the viewfinder. The Fuji X10 and X20 are similar but have poor quality optical viewfinders and as you zoom it obscures your view. While a Leica M has similar issues I am more then willing to put up with the faster lens at a full frame f/1.4 blocking some of the view then I am with the poor view in the Fuji X10.
Its with these thoughts in mind that I have been looking at the Panasonic LF1 and the Leica Leica C. The big thing about it is its EVF. While poor quality at least it has one, which is rare in this class of camera. I have played this camera now on several times and the other week I had another play and also took a few photographs on my own memory card to play with.
The shop was mixed light and I had a slow shutter speed with an ISO of 400. You can see the result above. ISO400 is quite high for such a small sensor and its handled it quite well.
Today we are very lucky in that there are very few bad cameras. Now its how a camera makes you feel, how it fits with the way you work that is more important.